Adobe Experience Manager (AEM) is the most powerful content and digital asset management system. It enables you to efficiently deliver digital content experiences that are innovative, consistent and scalable.
But, there’s a big problem. Because AEM is so comprehensive and flexible, the learning curve
for new users is huge.
The road to AEM success is usually fraught with avoidable rookie mistakes, frequently underused features and endless pages of confusing Adobe documentation. This guide is your fast track to AEM success.
Read on to get:
- An introduction to key AEM features from our seasoned AEM experts (which is actionable and easy to understand)
- Pro tips that help you get acclimated to AEM faster and avoid common mistakes
- Real-world examples of use cases to help you determine how and when to use features
- Step-by-step tactical instructions to perform common AEM author processes
Click to jump to a section:
Environments | Application Consoles | User Interface (UI) | Icon Glossary | Building Blocks | Site Structure | SEO-Friendly URL | Authoring | Assets | Tags | Next Steps
Let’s get started, there's lots to learn!
Environments
The first step to working effectively in AEM is to understand the types of environments. You can
think of environments like different levels within AEM. Each environment has different functions
and log-in portals. You’ll use different environments for developing, testing, staging and
publishing content.
The first step to working effectively in AEM is to understand the types of environments. You can think of environments like different levels within AEM. Each environment has different functions and log-in portals. You’ll use different environments for developing, testing, staging and publishing content.
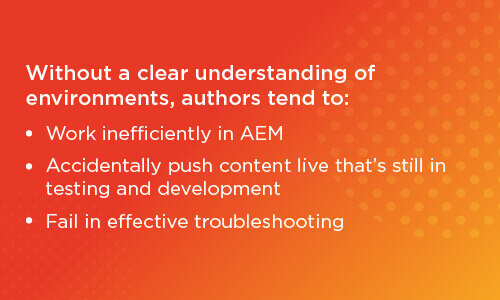
Why is this a critical first step? Without a clear understanding of environments, authors tend to:
- Work inefficiently
- Accidentally push content live that's still in testing and development
- Not effectively troubleshoot common AEM challenges
The three standard environments are: Development, Stage and Production
You’ll have access to different environments based on your role. But, you still need to be familiar with each environment to work efficiently and avoid costly mistakes.
How to use each environment
In each environment, there are at least two instances: Author and Publish.
Frequently Asked Question: If I use the “Publish” instance in the Development or Stage environment, will I push the update live?
No. Publishing in Development or Stage environments won’t push updates live. It will only push the update to that environment’s Publisher instance. Once the content is in Publisher, you can share a link with people who don’t have access to the system. You can make the instance password protected if needed.
You’ll only push an update live in the Publisher instance of the Production environment.
Using Author and Publish instances in each environment
Here’s an example of how to use these three environments and Author and Publish to create a digital experience:
Development Environment
Author instance: Let’s say your team wants to develop a new carousel component for a product landing page redesign. The developer will create, unit-test and receive approval from their local host environment. Then, they'll release the enhancements in the Development environment and validate the code. Now, as an author, you'll use the Author instance to build the content using the new feature. Even though your dev team has already validated the code, check for any functionality discrepancies. If there are any, immediately call them out.
Publish instance: When you’re ready for review and initial approval of that content, you’ll move the content to the Publish instance by publishing the page. You’ll then be able to provide a link to the page on the development site for review and testing purposes.
Staging Environment
Author instance: After passing tests in Dev, your team will then migrate the code/content in Staging. Be sure to stress-test all elements so you can identify anything that seems “off" and alert all relevant team members immediately.
Publish instance: When you’re ready for another round of review and approval, you’ll move the content to the Publish instance. If you’re receiving approval from non-AEM users, this is your final approval before moving the content to Production. Be sure to receive a chat or email with approval to continue moving ahead.
Production Environment (Live)
Author instance: Now, your team will use the Author instance in Production to validate code enhancements are working as expected. Then you can begin staging your content in Production. Confirm all new content has replicated exactly from Stage and you have approvals (if needed).
Publish instance: Then, you’ll push the content live by publishing. After publishing, navigate to your website and validate everything is working as expected across various browsers and devices. Then notify your team once the updates are live. Even if all the previous checks passed both dev and author validation, your broader team will want to perform final confirmation on the live site.
Pro Tip #1: Ensure consistency between environments
Testing and consistency are two critical components of every successful development release. Failing to maintain 1:1 content consistency across the environments is a common mistake. It’s inefficient both for developers trying to create code and marketers who are trying to obtain approval for new campaign initiatives.
You need to be consistent to make sure your whole team is testing new enhancements in Development and Stage environments that are as close to the Production version as possible. That will help you avoid delays and mistakes before pushing content live.
Pro Tip #2: Bypass Dispatcher for troubleshooting
If someone sends you a publisher URL for troubleshooting, you need to be able to quickly identify which environment is causing the issue. You can determine the environment by referencing the URL. Dispatcher is a caching tool that improves web page delivery for end-users.
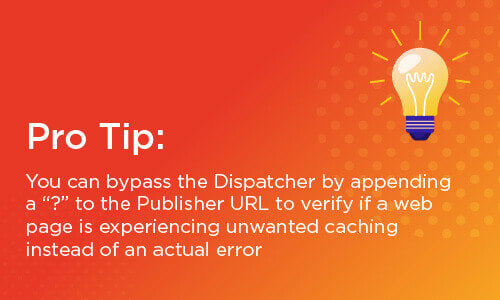
You can bypass the Dispatcher by appending a “?” to the Publisher URL to verify if a web page is experiencing unwanted caching instead of an actual error.
Pro Tip #3: Replicating or packaging authored content
To release new content, you have to manually replicate or package any new content across the necessary environments.
Application Consoles
Within AEM’s application, there are nine main consoles available from global navigation. Your accessibility to all consoles is dependent on user permissions and/or licensing.
As a beginner author, you will most frequently use the two most common consoles – Sites and Assets.
But it’s important to be familiar with all nine consoles so you can work most efficiently and work towards fully leveraging AEM’s capabilities.
Sites – This is the Content Management System (CMS) where you build website hierarchies using different content elements. One major advantage of AEM is that it’s extremely agile. With AEM Sites, you can launch new content at the speed your market demands. Website content is the anchor of most brands’ success. Become familiar with this console first and master it.
Assets – The Assets console is your traditional digital asset manager (DAM). It has powerful “out-of-the-box” features to upload, edit and manage assets to use across your multi-channel experiences. Assets include images, videos, documents, templates and content fragments. This console also has add-on features, like Dynamic Media and Brand Portal, that accelerate collaboration across your creative and technical teams and vendors. Along with Sites, you’ll use this console the most, especially as a beginner author.
Projects – Use this console to correlate different types of information to a “Project” so you can be more organized, productive and streamlined. Information in a project might include assets, experiences, links, description, team, landing pages, emails, workflows, launches and tasks.
Experience Fragments – With this console, you can create innovative digital experiences that transcend across your different marketing channels — not just your website. Imagine being able to deliver consistent brand messaging across channels without relying on numerous platforms and teams to support and execute your customer journey. AEM Experience Fragments makes this possible by allowing you to create repeating blocks of structured content with different variations for different channels.
Forms – This console provides a centralized portal for users to create, manage and publish dynamic forms for web and mobile devices. Data collection through forms is an extremely powerful tool for marketers to obtain first-party intelligence of their audience. The kind of data that can influence strategic, bottom-line-driving decisions. AEM Forms integrates with back-end processes to handle data in meaningful ways.
Screens – The Screens console allows you to leverage your digital experiences for in-store or in-venue jumbo screens. You might use Screens if you create content for in-person interactions (e.g. brick-and-mortar merchandising displays). Repurpose digital experiences like these to maximize their value.
Personalization – Use this console to create dynamic content experiences and deliver the right content at the right time on the right channel. With AEM Personalization, you can use known information, like ideal personas, targeted end-users or behavioral interactions, to design personalized experiences. Then, use rules to dictate the process flows to execute.
Commerce – Integrate an eCommerce system into the Commerce console to pull product data into AEM. Then, create personalized B2C shopping experiences based on contextual information. AEM Commerce also supports real-time management of product information, shopping cart, discount promotions, check-out experiences and more.
Communities – Use the Communities console to manage gated community sites and promote end-user engagement around an area of interest or expertise. You might use this console to develop relationships with site visitors through blogs, forums, file sharing, tag mentions or scoring.
User Interface (UI)
AEM has two user interfaces, Classic UI and Touch UI.
- Classic UI is a legacy version that AEM won't support in future versions.
- Touch UI works with both touch and desktop devices, and you’ll notice similar themes featured across the Experience Cloud solution landscape.
Touch UI allows you to use the latest AEM innovations and sets you up for success when you migrate to AEM Cloud. Throughout this guide, we’ll cover topics supported by version 6.4 and up using Touch UI.
Need help switching to Touch UI?
Adobe has removed most of the Classic UI documentation from their online resources. If you’re currently using Classic UI, you can find basic handling information within the AEM 6.2 Sites Authoring User Guide.
That being said, it’s critical that you transition to Touch UI to fully leverage the capabilities of AEM and set your team up for success in the future. Need expert help? Check out our AEM consulting.

Icon Glossary
We've built an image glossary to fast-track your acclimation to AEM! Click here to grab it for yourself.
Pro Tip: Be very cautious when deleting content
Once you've looked over the glossary, I want to call attention to this fact: there is no recycling bin or archive icon!
Once you delete content, it's really gone. You'll only be able to get it back through some expensive development time, so when I say be very cautious, I mean it! I've seen clients spend countless hours trying to recover something important that was accidentally deleted and nobody wins in this scenario.
Building Blocks
These will be frequently-used and knowing these will only help you learn the language of Adobe Experience Manager!
Components
Components are configurable elements used to build content. These can be either out-of-the-box Core Components or custom ones that you build using your development resources. We highly recommend using Core Components for the following benefits:
- Cuts costs and inefficiencies. Components are fundamental to using AEM. Custom components require expensive development time to develop, test and maintain. Core components are out-of-the-box and available for immediate use. They often meet all the needs of users without any customizations needed.
- Allows you to use the most innovative components. AEM enables you to create the most innovative digital experiences more efficiently and at scale. Core Components are already-tested Adobe proprietary tools to help you get the most out of this platform.
- Sets you up for long-term success on AEM Cloud. When you migrate to AEM Cloud, Core Components will automatically update to new versions as they’re released. No more development time spent constantly updating fundamental components to make sure they’re compatible with the new version.
The standardized categories of core components include Templating, Page Authoring, Container, Form, and Commerce.
Templating
- Navigation: Display a site navigation menu
- Language Navigation: Display a language switcher
- Breadcrumb: Display a breadcrumb navigation
Page Authoring
- Title: Display a page heading
- Text: Display a rich text paragraph
- Image: Display an image asset
- Button: Display a button or anchor button
- Teaser: Link an image or text
- Download: Display an asset for download
- List: Display a list of pages
- Experience Fragment: Display an experience fragment
- Content Fragment: Display a content fragment asset
- CF List: Display a list of content fragments
- Embed: Embed a third-party widget
- PDF Viewer: Embed a PDF Viewer widget to display Document Cloud PDF’s
- Progress Bar: Display a progress indicator
- Social Sharing: Add social sharing links
- Separator: Display a section divider
Container
- Container: Group and layout components
- Carousel: Cycle through content panels
- Tabs: Switchable content panels
- Accordion: Toggle panels of related content
Form
- Form Container: Group and layout form components
- Form Text: Display an input field
- Form Options: Display different options to choose from
- Form Hidden: Hidden form component
- Form Button: Display a form button
Commerce
- Product: Display a commerce product data
- Product Teaser: Display commerce product teaser
- Product Carousel: Display commerce product carousel
- Related Products: Display commerce-related products
- Product List: Display commerce products
- Search: Display product search results
- Featured Category: Display a list of categories
Related: Want more AEM tips and tricks? Try this blog!
Page Templates
With Page Templates, certain Roles (e.g. Admin, Developer, Template Author and Author) can create and edit content templates that other users must abide by. Page Templates help enforce content governance, but one of the advantages of AEM is that you get to decide how flexible or rigid you make these templates.
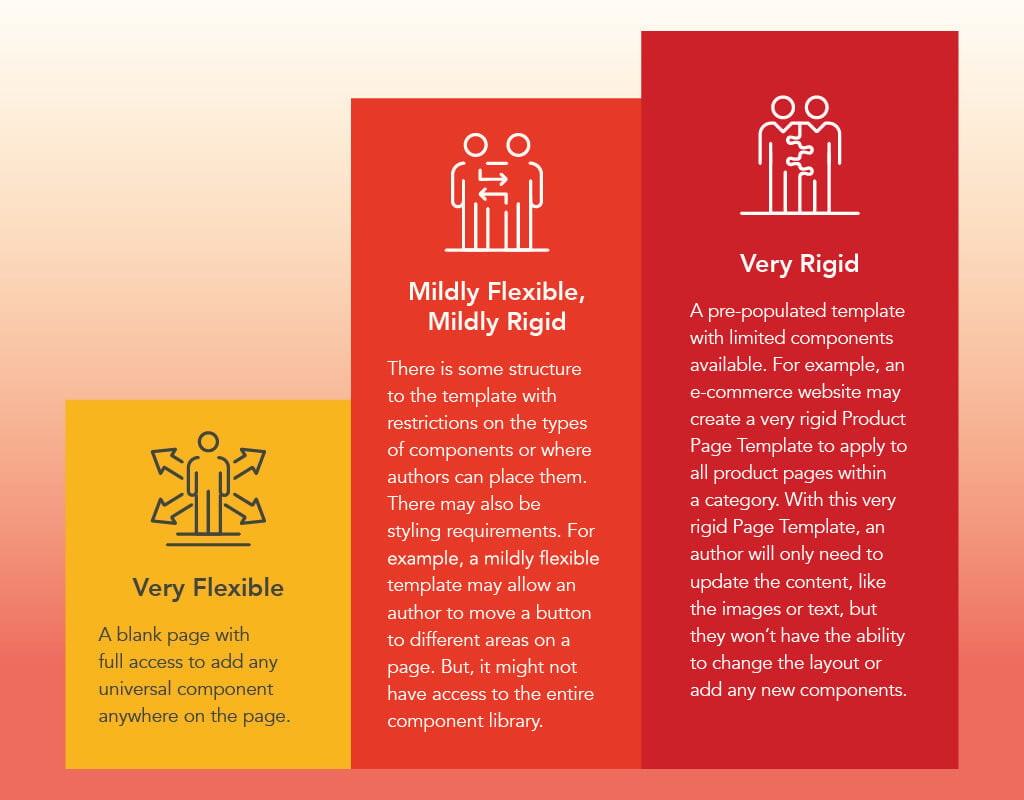
A more flexible template is right for you if:
- Your team includes experienced authors with a keen design eye. You need design experience as well as an understanding of AEM to create effective content experiences with a very flexible template.
- You need to be more agile and adjust your design on pages based on performance. More flexible templates allow authors to immediately make changes that could impact the customer experience and results, like moving the location of a call-to-action.
- You need scalability. Your platform is frequently launching new sites that all use the same core functionality.
- You have resources to anticipate future needs and develop a scalable content architecture.
- You’re willing to endure the upfront cost for long-term savings and benefit.
- You’d rather use development resources for creating innovations rather than making minor adjustments based on performance, new solution launches or new marketing tactics.
A more rigid template is right for you if:
- Your team doesn’t include experienced authors or authors with design experience.
- You want to promote consistent branding knowing that users can’t stray away from guidelines (since the rigid template doesn’t allow it).
- Your design and layout don’t frequently change. You might release new products, but how you promote that offering doesn’t change often.
- You have high author turnover. Or, you have many different markets using the same system and don’t have time for extensive onboarding.
- When branding requirements change, you’d rather rely on development for the “fool-proof” fix instead of relying on authors to edit templates.
A template that’s mildly flexible and mildly rigid is right for you if:
- Your marketing department likes to push boundaries to engage with audiences in different ways, but still needs guidelines to be “on brand.”
- You’re constantly evaluating metrics and recommending UX tweaks to improve performance but you still need to abide by strict brand guidelines.
- You have mixed skilled authors and provide proper onboarding and documentation.
- You’re a global brand. You need to be consistent but adhere to localization requirements.
- You prefer compounded small changes for anticipating future state. But, you’re not willing to completely overhaul the system.
Pro Tip: Become familiar with Roles
When creating a new template, there are a few different Roles necessary to orchestrate this process. These Roles include an Admin, Developer, Template Author and Author. Want more information on Roles? Reference Adobe’s documentation on Page Templates.
Experience Fragments versus Content Fragments
Beginner authors often confuse content and experience fragments. Content Fragments are a powerful tool that helps create consistent content experiences more efficiently. They're also wildly underused!
Here’s a breakdown of the differences between Experience Fragments and Content Fragments and how to best use them.
Pro Tip: Use structural Content Fragments
There are two types of content fragments — simple and structural fragments. You can’t customize simple fragments — they’re out-of-the-box and have very limited features. In contrast, with a structural content fragment, you make it easier for authors to input content. This is the method we recommend for more customization and consistency.
Ready to create a structural content fragment? You need to create a content fragment model. Click here to skip ahead to the Assets section for step-by-step directions.
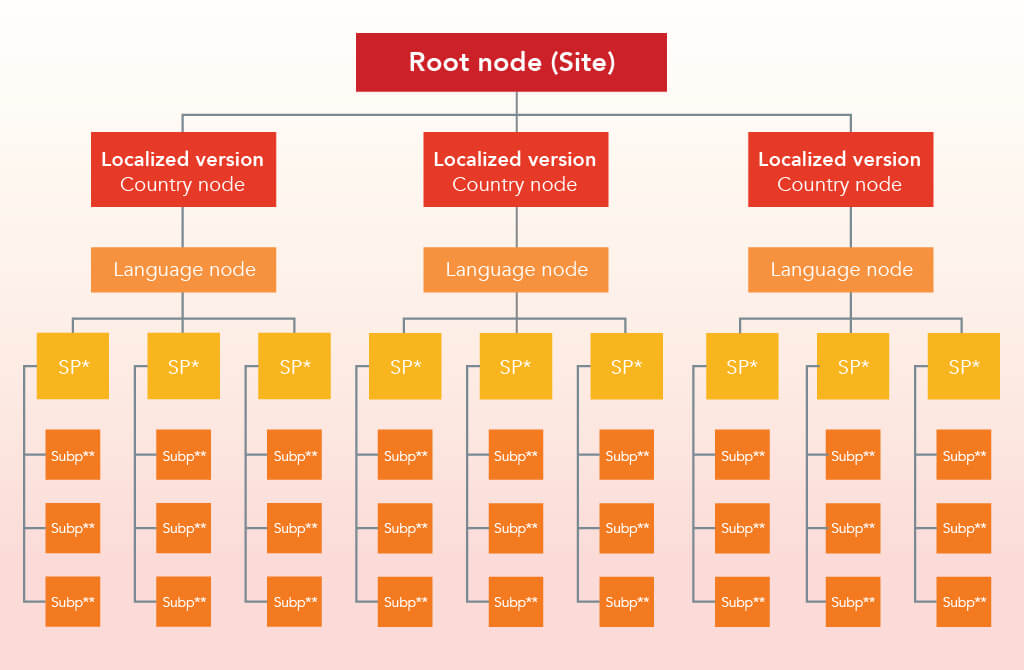
Site Structure
To create an intuitive user experience, all websites should follow a similar page hierarchy, like this outline:
Pro Tip #1: Reorder your pages in your navigation by editing your site structure
In most circumstances, your navigation will pull in from your site structure. AEM will automatically order your pages for you in the order that you created them. If you need to reorder pages, then you need to drag and drop that page within the tree site structure.
For example, you might need to reorder pages if you add a new product page and you want this page to be the first menu item.
Pro Tip #2: Make broad configurations at the root node page so the descendant pages inherit the edit
To maintain the site structure and make any updates or edits, you need to first consider the site hierarchy.
When you’re making global edits, start by finding the root node page where that information is located. You need to find the root node page and make the change there so your edit appears across all applicable pages, not just one page you’re editing.
A global edit might include updating a logo, header or footer or enabling GDPR settings. This information is going to be in different locations based on your template and developer customizations. If you’re unsure where the information is located, start by searching through the highest nodes.
Once you make the edit to the parent page, the edit will cascade to all descendant pages.
Note: Most developers don’t lock global settings. So, you could break the inheritance of a setting from a parent page to a descendant page and just update a descendant page. If you don’t see your global edit appearing on the homepage, then you likely broke the inheritance and only updated a descendant page.
You need to update the parent or the root node page for the global edit to apply.
Pro Tip #3: Follow this simple process to easily manage images in the system
Make sure your folder structure in Assets mimics your site’s structure. That way you can easily manage images. You’ll stay streamlined across your author team by avoiding duplicate images and disorganization.
SEO-friendly URL
The page or asset structure defines URLs. Here's how to adhere to SEO best practices so users can easily locate your content.
When creating a new page, authors will follow the prompts from the Create Page wizard. Once you select a template, you’re required to add a Title that displays in the browser tab.
Then, you’ll add in the Name field to create the page path. If you don't add anything in this field, AEM will generate the field based on the Title with all lowercase and hyphens instead of spaces. URLs should be human-readable, meaning that anyone should be able to identify the content without viewing the page.
Do & Don’t SEO URL example:
Men’s Waffle-Knit Tee Product Page URL structure
- Do: https://www.companyname.com/en/products/mens/waffle-knit-tee.html
- Don’t: https://www.companyname.com/EN/Products/Mens_Cateogry/sku-TE8308KR.html
Authoring
Sites Action Toolbar
Here’s how to fast-track your familiarity with this toolbar and avoid common mistakes.
- Create – used to create a new element.
- Edit – opens a page in Edit mode.
- Properties – prompts the page properties configurations.
- Lock – locks a page while working but only the same user can unlock it.
- Copy – used to replicate an existing element (“1” will be appended to the original name).
- Move – either move or rename an existing page – this will move child pages as well (unpublish before this action).
- Quick Publish – this feature will publish the page or new edits.
- Manage Publication – used to manage publication (publish or unpublish) multiple pages or schedule deployments for a later date and time.
- Delete – remove a page from the site (unpublish before this action).
Creating a New Page
Step 1: Navigate to the desired parent element within the site’s structure.
Step 2: Either select the blue “Create” button in the upper-right corner or click directly on the parent’s thumbnail. That will prompt the full toolbar menu and you’ll select the first option labeled “Create.”
Step 3: Then click “Page” to initiate the Create Page wizard.
Step 4: From the Template step, choose your desired template then select “Next” to progress to the Properties setup.
Step 5: Add SEO Title and Name fields. From Properties, add the required Title field that will display in the browser tab. The Name field isn’t required but we recommend adding it for SEO.
Reference the SEO-friendly URL section of this guide for more tips.
Pro Tip: How to create a new page fast... even without documentation
If your instance is lacking documentation or direction, start by crawling the site to identify similar page layouts. Then, within Sites, locate the existing page through the URL structure. Click on the thumbnail to see which template was used.
You have two options to create the new page depending on how closely the existing page should resemble the new page:
1) Copy that page and swap the content
— OR —
2) Use the same template to start building from scratch
That will ensure you have full access to the desired functionality within that given template.
Related read: Key differences between a DXP and CMS to know
Adding Content

Step 1: Locate the page. Navigate the tree structure in Sites then click the thumbnail image and select Edit in the upper toolbar. This will open the page in a new tab within the browser. Unless the page is locked, it will be ready for editing.
Step 2: Locate an empty parsys. Find the placeholder text “Drag components here.” (Or you can select an existing component and click the plus sign icon within the action toolbar. That will insert a new component directly above it.)
You can drag and drop a component from the left-side panel. Alternatively, you can select the plus sign icon (the Insert Component dialog) to display the full list of components available within that section.
Step 3: Create a container. When creating a new section of content, you want to first use a container as the parent element to nest components within. With grouped elements, you avoid having to copy and paste one element at a time.
Plus, grouping elements in a container makes it easier to follow guidelines, like margin requirements.
Creating Containers Pro Tip:
Leave extra parsys between each section and subsection to avoid nesting unwanted elements. This also makes it easier to add new content later on.
A common mistake among beginner authors is they end up nesting containers together. That’s disorganized and it could break guidelines and impact UX. Make sure to validate proper nesting by hovering over parent elements and ensuring there isn’t any overlapping.

Step 4: Add the component and configure. Once you add a component within the container, then you can configure the element. To add content, use the configuration dialog. Configurations will vary depending on requirements, but you can open the dialog by hovering and clicking on an element.
Then, select the wrench icon from the action toolbar. Update the configurations available within the dialog (reviewing every tab). Then click on the checkmark to save or the “X” to cancel without saving.
Layout Container
Layout Containers are an underutilized secret weapon. It allows us to create innovative designs with a business’s existing assets WITHOUT development time.
Here are two pro tips to best use this little-known AEM Core Component:
Work in sections by adding a parent container
Once you have a parent container, you can nest other containers to create more intricate layouts to display your content. A parent container will also provide greater flexibility to maintain optimal rendering across any viewports. To create a parent container, use either the Layout Container or Container from the Core Component library.
Adding containers side by side
First, enable Layout mode by selecting the double-sided arrow on the component’s action toolbar. Then adjust the margins to reduce the size. If you want to add two containers side by side, then add another sibling component and adjust the size ensuring the combined width doesn’t exceed the max-width.
Want more information on AEM’s responsive layout? Click here.
Responsiveness
Responsiveness is a feature you can use when:
- Responsiveness isn’t ideal AND
- You need to serve the content to end-users right now
But, this shouldn't replace front-end development with media queries. This feature is helpful, but it won't provide the precision achieved through development efforts.

Demo example: Fixing mobile responsiveness
If a page with Core Components isn’t rendering with optimal responsiveness, use the device emulator to adjust content for various viewports. In the image above, the 33/66 container wasn’t stacking automatically in mobile.
So, the author used the emulator to specify the container widths for tablet and mobile devices. You can do this in three easy steps:
- Select the emulator icon from the menu
- Select each container element and choose the layout feature from the action toolbar
- Drag the sides to define the ideal width
Responsiveness Tip: Don’t use this feature to rearrange content
The Responsiveness feature does not support rearranging content at various viewports. If you use the emulator mode to move or remove an element, then this change will affect all devices.
Previewing a Page
After configuring a section, make sure to preview the page before publishing to ensure your layout is matching what you’re seeing in edit mode. We recommend you preview frequently while you’re editing to avoid layout issues.
Here’s how to preview:
Select the Page Information icon in the upper left menu to display the flyout menu then click “View as Published.”
— OR —
You can access preview mode by appending the parameter “?wcmmode=disabled” to your author URL.
Page Properties
Page Properties handles page-level configurations that are not visible on a page. You might use Page Properties to:
- Add a vanity URL
- Add metadata through tags and a description
- Hide the page in the navigation
How to view Page Properties:
You can view Page Properties from the tree structure of the Sites consoles OR within edit mode by clicking the Page Information menu then selecting “Open Properties.”
Page Properties configurations will differ depending on templates. As an author, it's important to familiarize yourself with the various features to better inform your decisions when working without defined processes.
Page Properties Pro Tip: Keep it simple
First, test all Page Property options in lower environments before moving to production. If all options perform the same function, then evaluate the best end-user experience. Does one implementation provide a more streamlined experience?
Simplicity is also key for maintaining complex author environments that might not have documentation to support every function. Make sure you're testing, evaluating, documenting and communicating across involved teams to develop processes that will improve efficiencies.
Page Activation
Once you’ve thoroughly tested and obtained approval, your page is ready for activation.
Step 1: Using the Page Information menu, select “Publish Page” and follow the activation wizard. You'll activate the page as well as all references on the page.
Step 2: Then use your environment’s publisher link to display the final version of the published content.
Always keep in mind: Activating a page in production will push your page and all references live.
You can deactivate a page by selecting “Unpublish Page” from the Page Information menu or the Manage Publication within the Sites console.
Page Activation Pro Tip #1: Initiating the approval workflow
Some users will not have permission to publish content directly. When that’s the case, these authors can use the Manage Publication action to initiate the approval workflow.
Page Activation Pro Tip #2: Clear your cache
If you’ve activated a page and you’re still seeing old content displayed, your first step to troubleshoot should be to clear your cache. That often does the trick.
Page Activation Pro Tip #3: Re-publishing
The page auto-saves any edits you make, but you have to re-publish to serve saved edits to end-users.
Versions
With every activation launch, you create a new version of the page and edits automatically save.
If you want to revert to an older version…
- Select the page thumbnail from the tree.
- Then toggle the side panel and select “Timeline.” This will display the page history and any versions created.
- Click the “Revert to this Version” button to restore that content.
But, be careful relying on this feature too heavily.
Every system will have different settings on how many versions you can store. And, every activation will automatically create another.
Versions Pro Tip: How to avoid overriding important versions To avoid overriding important versions, use "View as Published" to evaluate your page in lower environments instead of reviewing directly within Publisher. You can also try delaying activation until after your page has been thoroughly unit tested in Author and is ready for the next steps.
Related read: The advantages of choosing AEM as a cloud service
Assets
Assets is a digital asset manager (DAM) housed within AEM’s application. With this console, you can store, edit and manage assets including images, videos, documents, content fragments and more. The Assets console has advanced collaboration capabilities so you can leverage content quickly across omnichannel experiences.

When navigating Assets, make sure you’re viewing this console using Card View mode (select the view menu icon directly right of the blue Create button).
That’s compared to the Sites console, which uses Column View mode. In Assets, many of the essential features are only available through Card View mode. It's commonly missed because you have to manually shift view modes.
Key Features
Collection – allows users to categorize similar assets — by location, commonalities or user selection — for organizational purposes. This feature streamlines accessibility for repeated usage by the user network (authors, creative, marketers, dev, etc.)
Metadata – allows you to add relevant information about an image for search engine optimization.
Tagging – use Tagging to classify assets for internal or external organization. For internal purposes, you can assign tags for search filtering within the system. For external purposes, you can use tags for displaying dynamic content that appeals to an audiences’ profile.
Renditions – use this feature to create different "cuts" of an asset for ideal rendering across different areas of your site.
Renditions example: Let’s say you feature a recent press release on your home page with a small thumbnail, headline and intro copy. End-users click the call to action and are redirected to the page displaying the same image as a banner. Depending on where the image is displaying, you could use a different rendition of that image for the banner versus the call to action.
Versions – use Versions to restore an image to a previous state before edits within the system. Testing not working as expected? Reverting to an old design due to timing constraints? Simply revert to the saved version.
Helpful resource: Want to review a mega-list of supported file types in Assets? Click here.
Assets Action Toolbar
Familiarize yourself with this toolbar to fast-track your success within the Assets console.
- Create – create a new workflow, folder, file or content fragment
- Share Link – share an asset or folder URL with other users
- Download – download the asset to your local machine
- Checkout – lock asset to other users while you are making changes
- Properties – asset metadata schema (customizable)
- Edit – basic asset editor features (rotate, crop)
- Annotate – make comments on assets
- Manage Tags – add tags
- To Collection – to group assets for sharing with users
- Copy – create a copy of an asset or folder (“1” will be appended to the original name)
- Move – used to remove or rename an asset (unpublish before this action)
- Quick Publish – to publish the asset
- Manage Publication – used to manage publication (publish or unpublish) multiple assets within a defined scope or schedule deployments for a later date and time
- Delete – remove asset or folder (unpublish before this action)
Asset Organization
Establish folder organization early on and remain consistent to ensure automation continues to function properly.
As a starting point, mimic your Assets folder structure after the corresponding site. So, you should have a root folder representing the site followed by a country/language folder and broken down by landing and sub-page folders.
Separate commonly referenced files, such as icons, logos, product images, videos and PDFs, in individual folders with a sibling relationship to the landing page folders.

Did you inherit a mature system without any historic documentation on Asset organization? Here’s what to do.
It’s common for authors to inherit a mature system without any historic documentation of why/how processes were originally set up. As an author in these situations, you must become a system detective.
Start by examining existing functionality that's working so you can replicate the implementation. Authors are like the front line of defense. You might not have the skills to identify complex backend processes that are seemingly working counterintuitively against your efforts. But, it's imperative to gain a deep understanding of how they interact with the system at each roadblock. With this detective work, you’ll become your team's leading expert.
Follow these file naming best practices. (Without them, broken images are more likely and files are harder to search for.)
File naming best practices
- Use dashes instead of spaces
- Clearly label the asset for searching
- Use all lowercase letters
- Avoid using any special characters (except for dashes or underscores)
Unpermitted characters for naming conventions
Here's a space-separated list:
File: * / : [ \ ] | # % { } ? &
Folder: * / : [ \ ] | # % { } ? " . ^ ; + & t
- Do: companyname-transparent-header-logo.png
- Don’t: Screen shot_2021-01-01.png
Use Tags to easily search assets, itemize results into collections, and leverage Adobe Sensei through smart tagging. Add tags through Properties on the Basic tab or by selecting Manage Tags from the toolbar. From either configuration, you can apply multiple tags using the tag browser.
Need more direction on how to create tags? Skip to the Tags section of this guide.
Use Collections to collaborate with other users and create, edit and share assets. Define these groupings through static or dynamic categorizing depending on your business requirements.
Create a new collection in these three steps:
- Access the Collections folder from the Assets console global navigation then click create.
- From the Create Collection wizard, configure the required Collection Title.
- Determine if the collection should be public or grant access to specific user roles.
Collections Pro Tip:
For static references, manually select the asset(s), click the To Collection feature from the toolbar and assign them to their corresponding collection.
The Profiles feature also allows for Asset organization. We won’t cover that here because it’s pretty advanced. Want to learn about it? Check out Adobe’s documentation.
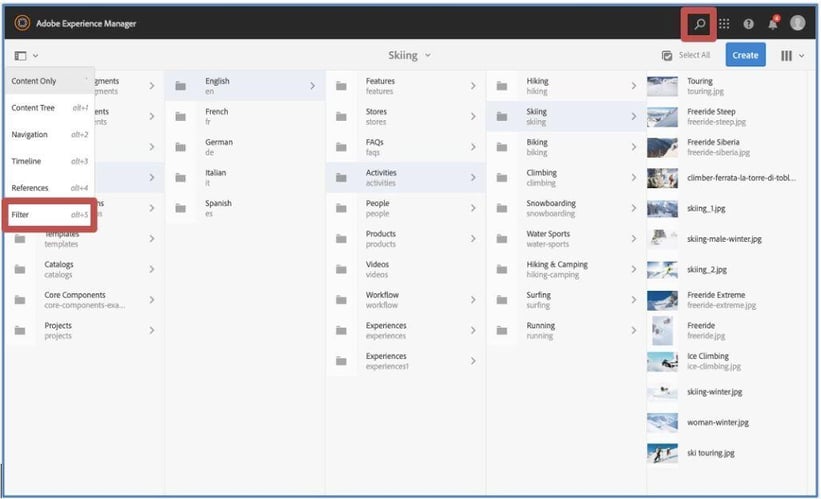
Search and Filtering Assets
You can search through the various consoles. You can also access assets through the left-side panel toggle icon using the Filter option.
Filter automatically prompts the filter properties from the search menu. Filter properties include saved searches, folder directories, files or folders, file type, file size, last modified, status, orientation, style, insights, Adobe Stock and UGC.
Content Fragment Models
three steps to enable and configure content fragment models:
Step 1: Make sure this feature is enabled in Configuration Browser.
Step 2: Now, make sure it’s applied to your Assets folder. To complete this, an Admin must navigate to Tools > General then open the Configuration Browser tile. From here, select the blue Create button in the upper right and enter your desired Title to correspond with your new configuration. Then choose the “Content Fragment Models” option. Click Create to save the configurations.
Step 3: Choose your content fragment model configuration. Start by selecting the global navigation and clicking Assets. Choose Files then navigate to your desired folder. Select the folder by hovering and clicking on the thumbnail until the checkmark overlay appears and click Properties from the toolbar (or by using the (p) keyboard shortcut).
From the folder’s properties, select the Cloud Services tab and choose your content fragment models configuration that you created in the previous step. Click “Save & Close” to complete.
Here are four steps to creating a new content fragment model:
Step 1: Select the global navigation then click on the Tools icon then select Assets from the left-side menu. This will prompt the Assets menu.
Step 2: Select the Content Fragments Models tile then choose the configuration folder.
Step 3: Click on the blue Create button and specify the required Title (and description if necessary) and click Create again to open the editor.
Step 4: Once you’ve completed the schema, save and exit the editor then publish the model from the console toolbar menu.
Content Fragment Model Pro Tip: Know your available data types
You need to know your available data types before creating your model so that you can consider limitations. Planning for limitations and business requirements in advance is a lot more effective and efficient than reacting to issues as they arise during the build process. Check out this section of Adobe’s documentation[7] to get familiar with available data types.
Creating a Content Fragment
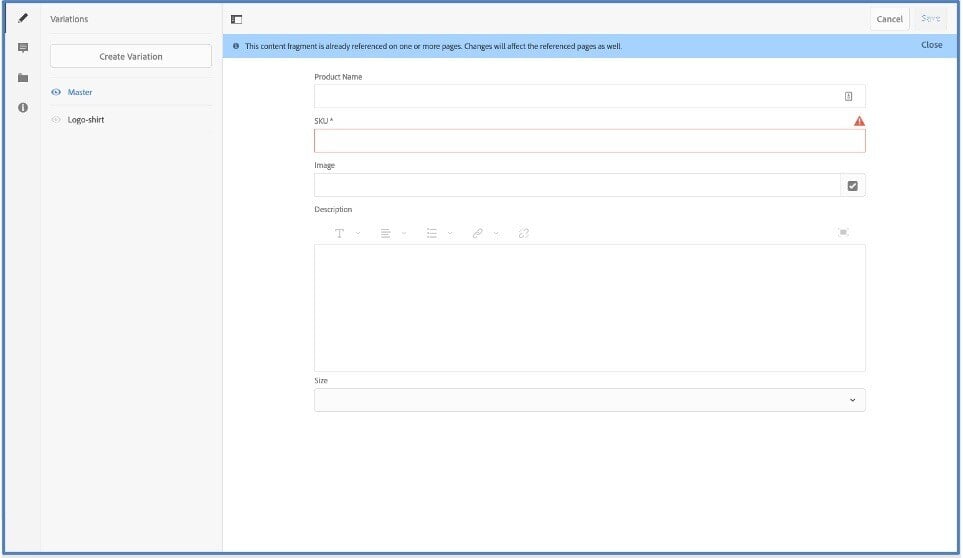
Once you've created your model, saved and published it, here’s how to create a content fragment in five simple steps:
Step 1: Navigate back to Assets > Files from the global navigation. Select the folder that you configured in Step 2 of the model enablement process above.
Step 2: Click the blue Create button and select the Content Fragment option.
Step 3: From the New Content Fragment wizard, choose the model that you created. Then click Next and specify the required Title. Select Create to complete the process and open the editor.
Step 4: Within the editor, you can input the data and create any variations of the content by selecting the Create Variation button from the left-side panel. Once you’ve made all changes, click Save to complete. Publish the fragment from the Assets console toolbar using the Quick Publish option.
Ready to learn more advanced capabilities of content fragments? Explore these topics in AEM’s documentation:
Tags
Don't underestimate the power of tags. This feature is extremely helpful for system organization and usability. And, it’s also key in creating dynamic content that appeals to your audience.
You can create tags as metadata under Tools > General using the Tags folder.
A Namespace is a similar concept to a folder. Create a Namespace to represent a site. Then, you use Tags to organize the tag hierarchy.
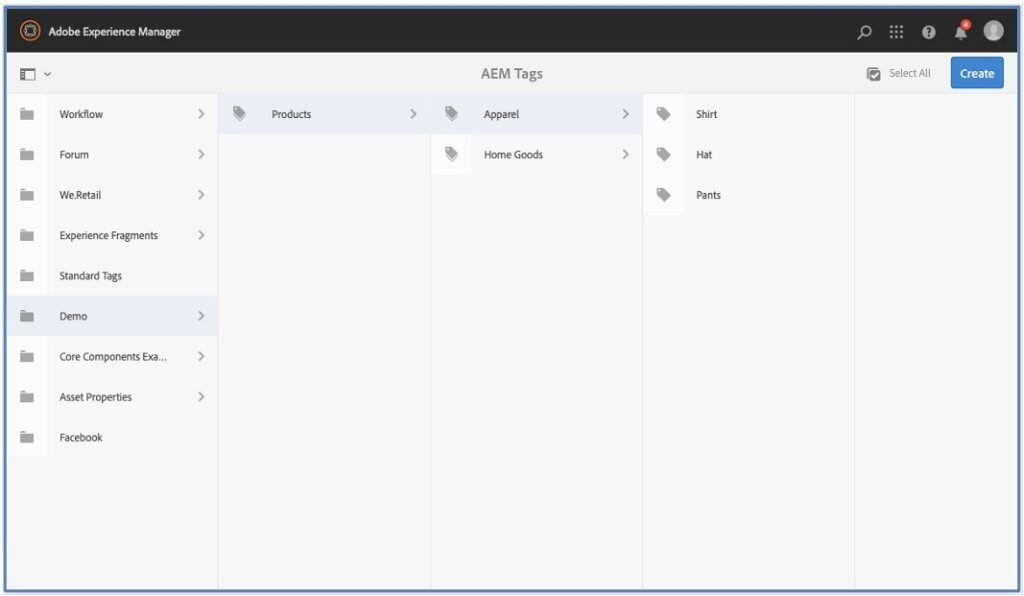
Example: Navigating Namespaces and Tags
Under your site’s namespace, you could have Products as your parent tag with Apparel and Home Goods as its direct children elements. Any descendants of a child further identify a specific item.
In the Apparel example, Shirt, Hat and Pants illustrate the Product tag’s structure. Use Tags to classify both pages and assets. Create tags within Properties of the element.
Pro Tip: Use Adobe’s Sensei for AI
With this tool, you can train your system to recognize similar items and automatically classify them.
Your Next Steps
With this guide, you should now be able to:
- Create new pages
- Configure pages
- Preview and activate content
- Create Content Fragment Models & Content Fragments
- Create Experience Fragments for promoting channel agonistic content
- Organize Site and Asset structure according to best practices
- Understand when and how to use out-of-the-box components
- Navigate Touch UI
- Understand the key features of Assets
- Best practices for asset management
- Create and use tags for categorizing content
Now, put all that you learned into action so you can create consistent, innovative digital content experiences faster. Save this guide and come back to it often to make sure you’re best using AEM and avoiding common mistakes.
Need expert help managing AEM or migrating to the cloud? Our AEM consulting team is happy to work with you / your teams!


