If you're new to Adobe Experience Manager, you're probably researching ways to get ahead - or pitfalls to avoid. There can be a major learning curve for this powerful platform, so here's some tips and tricks pulled from our beginner's guide to help.
I'm going to speak in terms seasoned AEM users will know, so if you're new to the platform or maybe don't quite have a grasp of everything, grab the guide first and bookmark this page for later!
Need a helping hand? Our AEM consulting services are for you!
Pro Tip #1: Ensure consistency between environments
Testing and consistency are two critical components of every successful development release. Failing to maintain 1:1 content consistency across the environments is a common mistake. It’s inefficient both for developers trying to create code and marketers who are trying to obtain approval for new campaign initiatives.
You need to be consistent to make sure your whole team is testing new enhancements in Development and Stage environments that are as close to the Production version as possible. That will help you avoid delays and mistakes before pushing content live.
#2: Bypass Dispatcher for troubleshooting
If someone sends you a publisher URL for troubleshooting, you need to be able to quickly identify which environment is causing the issue - and you can do this by referencing the URL.
Dispatcher is a caching tool that improves web page delivery for end-users. You can bypass the Dispatcher by appending a “?” to the Publisher URL to verify if a web page is experiencing unwanted caching instead of an actual error.
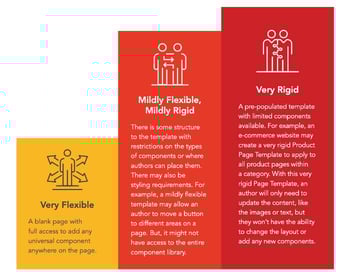
#3: Page template flexibility
You can have templates that are quite flexible, very rigid, or somewhere in between. Here's a few key notes to consider when developing this crucial building block:
A more flexible template is right for you if:
- Your team includes experienced authors with a keen design eye. You need design experience as well as an understanding of AEM to create effective content experiences with a very flexible template.
- You need to be more agile and adjust your design on pages based on performance. More flexible templates allow authors to immediately make changes that could impact the customer experience and results, like moving the location of a call-to-action.
A more rigid template is right for you if:
- Your team doesn’t include experienced authors or authors with design experience.
- You want to promote consistent branding knowing that users can’t stray away from guidelines (since the rigid template doesn’t allow it).
- Your design and layout don’t frequently change. You might release new products, but how you promote that offering doesn’t change often.
A template that’s mildly flexible and mildly rigid is right for you if:
- Your marketing department likes to push boundaries to engage with audiences in different ways, but still needs guidelines to be “on brand.”
- You’re constantly evaluating metrics and recommending UX tweaks to improve performance but you still need to abide by strict brand guidelines.
Make sure to understand roles!
When creating a new template, there are a few different Roles necessary to orchestrate this process. These Roles include an Admin, Developer, Template Author and Author. Want more information on Roles? Reference Adobe’s documentation on Page Templates.
#4: Use structural Content Fragments
There are two types of content fragments — simple and structural fragments. You can’t customize simple fragments — they’re out-of-the-box and have very limited features.
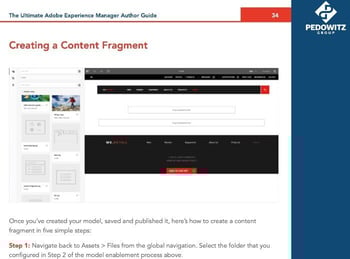
In contrast, with a structural content fragment, you make it easier for authors to input content. This is the method we recommend for more customization and consistency, but we find it's often underutilized!
Know your available data types
When creating your content fragment model, you'll need to know your available data types to accurately assess limitations.
Planning for limitations and business requirements in advance is a lot more effective and efficient than reacting to issues as they arise during the build process. Check out this section of Adobe’s documentation to get familiar with available data types.
#5: Reorder your pages in your navigation by editing your site structure
In most circumstances, your navigation will pull in from your site structure. AEM will automatically order your pages for you in the order that you created them.
If you need to reorder pages, then you need to drag and drop that page within the tree site structure. For example, you might need to reorder pages if you add a new product page and you want this page to be the first menu item.
#6: Don't overcomplicate image storage
Make sure your folder structure in Assets mimics your site’s structure! That way you can easily manage images. You’ll stay streamlined across your author team by avoiding duplicate images and disorganization.
For example, if I have a page with a page URL of /products/industrial/product-x, then I should store those product images in a folder that's a sub-folder within products and the "industrial" folder in the Digital Asset Manager (DAM).
This way, it's far easier to find images in the future when going into your DAM and make it easy for other authors to know where to upload an image in the future!
#7: Work in sections on a page by adding a parent container
Once you have a parent container, you can nest other containers to create more intricate layouts to display your content.
A parent container will also provide greater flexibility to maintain optimal rendering across any viewports. To create a parent container, use either the Layout Container or Container from the Core Component library.
#8: Adding containers side by side
First, enable Layout mode by selecting the double-sided arrow on the component’s action toolbar. Then adjust the margins to reduce the size.
If you want to add two containers side by side, then add another sibling component and adjust the size ensuring the combined width doesn’t exceed the max-width.
#9: Initiating the approval workflow
Some users will not have permission to publish content directly. When that’s the case, these authors can use the Manage Publication action to initiate the approval workflow.
If you're an approver, make sure you check on a daily basis any changes that are in the queue!
#10: Clear your cache
If you’ve activated a page but you’re seeing old content displayed, your first step to troubleshoot should be to clear your cache.
You'll find that often does the trick!
#11: Avoid overriding important versions
Use “View as Published” to evaluate your page in lower environments instead of reviewing directly within Publisher. You can also try delaying activation until after your page has been thoroughly tested in Author and is ready for the next step.
This can prevent an accidental overwrite or saving a page in a state you didn't want it!
#12: Use Adobe’s Sensei for AI
With this tool, you can train your system to recognize similar items and automatically classify them. Learn more about Adobe Sensei for AI.
Want even more?
- Ask us about how we can consult on your instance to help you get more
- Read about available cloud services options


