You may be using UTM parameters to track your marketing campaigns, but you may not be capturing all the information needed through UTM parameters in Marketo.
Let’s take a look at how to pass data to Marketo once a lead clicks a URL with defined UTM values.
Need more? Try an online course, or enlist our consulting services to optimize reporting, design campaigns, and much more from a 3x Partner of the Year!
How to track UTM parameters in Marketo to capture lead source
Step 1: Create UTM parameter fields
The first thing you will need to do is create at least the three required UTM parameter fields in your Marketo database as custom (string) fields. You can find this under Admin ⇒ Field Management ⇒ New Custom Field.
Field Name Examples:
- UTM Campaign
- UTM Medium
- UTM Source
If you have a CRM, such as Salesforce, you will need to connect your tracking data to it in order to automate reporting. This way you can tell how much revenue is being generated from your various marketing campaigns. It’s best practice to create the new custom fields in SFDC first so they will automatically be created in Marketo and kept in sync with your CRM. You will want to make these fields visible to the Marketo Integration user by allowing read/edit access and review in Marketo to ensure they were properly synchronized.
Quick note: Remember to map these fields for lead to contact.
Your new fields are ready!
Related: Optimize your Marketo / Salesforce sync
Step 2: Add new fields to the intended form
Add the new fields to any Marketo lead form where applicable and make sure to mark them as hidden fields.
Tip: Ensure you have the form pre-fill disabled at the field-level. When enabled, it pre-populates the current stored value in the lead’s record if they are cookied and previously filled out a lead capture form with UTM parameter tracking. This is incorrect and needs to be overwritten each time for accurate tracking to take place for your marketing campaigns.
Thus, the easy solution is to disable it.

Step 3: Set the field value
There’s an option in the form editor to set the field value based on URL Parameter. The “Get Value From” section is a critical part in selecting how you will pull parameters, so here you need to select URL Parameter from the drop down menu.
For “Parameter Name,” enter your URL parameter from your link (ex. utm_campaign).
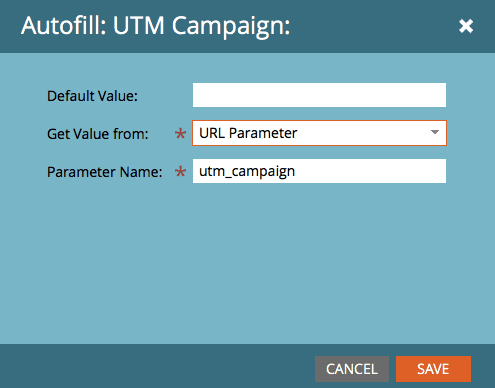
You will need to repeat this step for each hidden parameter field.
Step 4: Create URLs
Finally, create URLs with your URL builder tool and test your form. Fill out the form and validate your test lead record to see if the UTM parameter values pass to the fields as expected.
Once you’re able to track the UTM parameters in Marketo, you can begin analyzing your web traffic sources. This is a simple way to see what is driving site traffic and converting that traffic into leads, and in turn customers, so you can optimize and grow.
Like this content? You’ll love our Marketo Engage training with leading experts to drive your career higher! And be sure to read investigative techniques for troubleshooting Marketo.